example, how to create a custom certificate for OPC UA and how they must be distributed
This example shows how to create the necessary certificates (root, server and client certificate) using XCA:
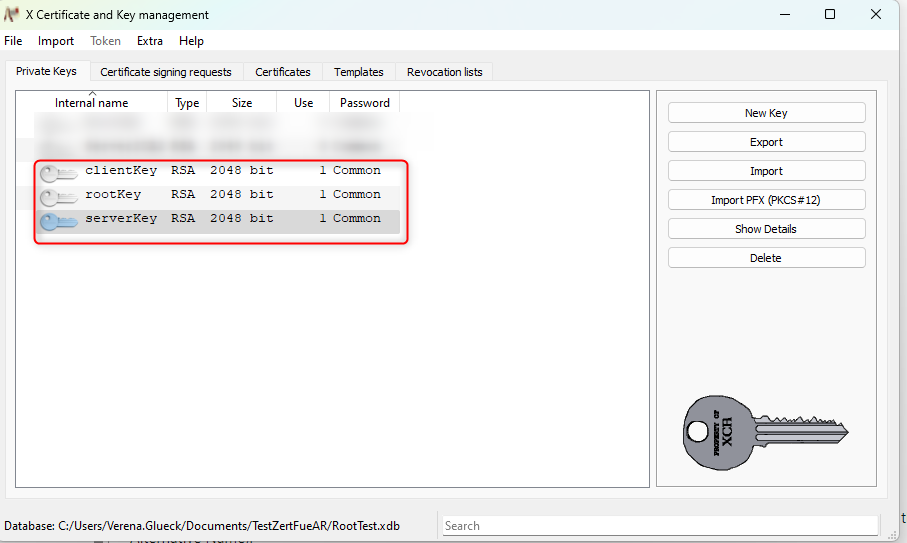
1. Create 3 private keys (for example: rootKey, serverKey and clientKey( this keys are necessary for the certificates))
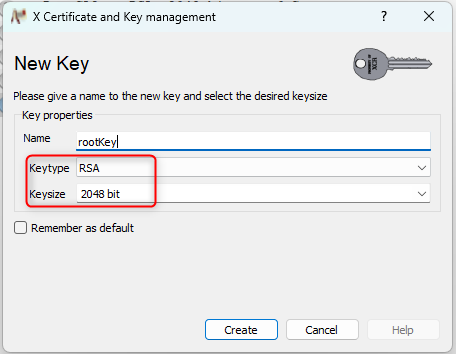
1. Create 3 private keys (for example: rootKey, serverKey and clientKey( this keys are necessary for the certificates))
(all 3 keys are generated with the same conditions but different names)
2. Create a root-, a server- , and a client-certificate
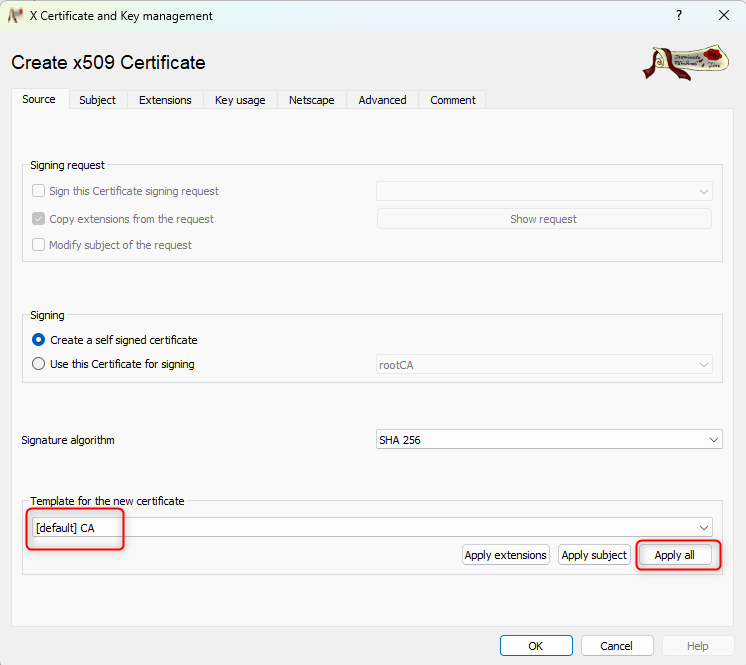
Root-certificate:
- select "[default]CA" and click on "apply all":
- switch to "Subject" and fill out the fields. Important: Internal Name & commonName should be unique in
each certificate:
You can select the before created key for the root certificate or you can also create a new one:
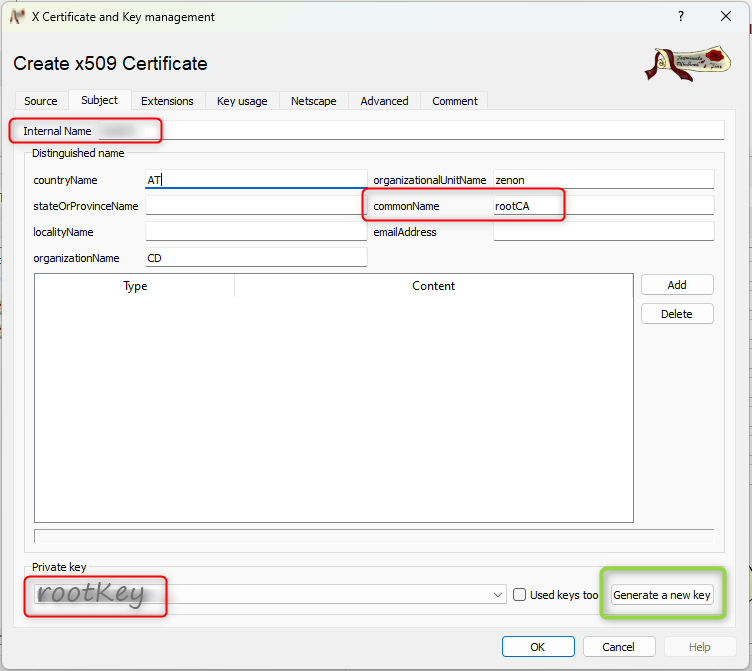
You can select the before created key for the root certificate or you can also create a new one:
- switch to "Extensions" and select "Certification Authority" and activate both "Key identifier":

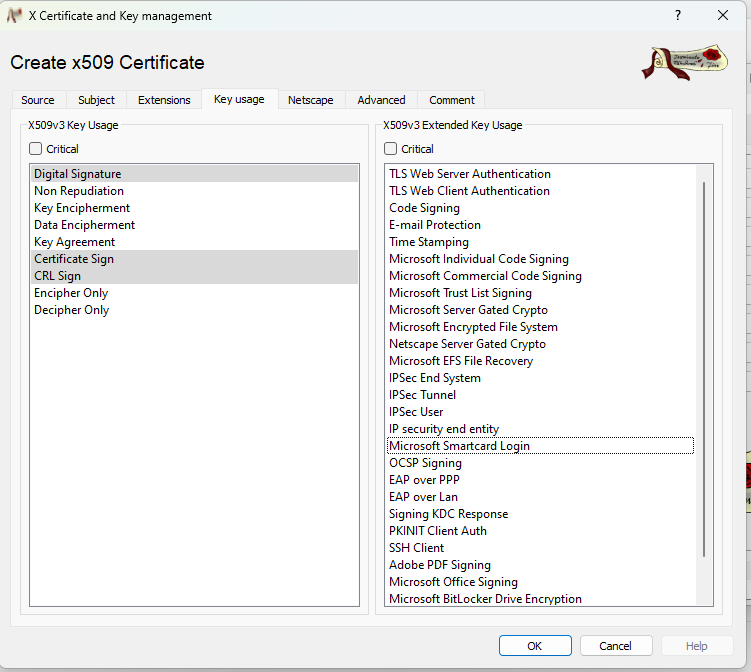
- switch to "Key usage" and select "Certificate Sign and CRL Sign" and click on "OK" ( the root certificate will be created):
Server -certificate:
- click on the root certificate and select "New Certificate":
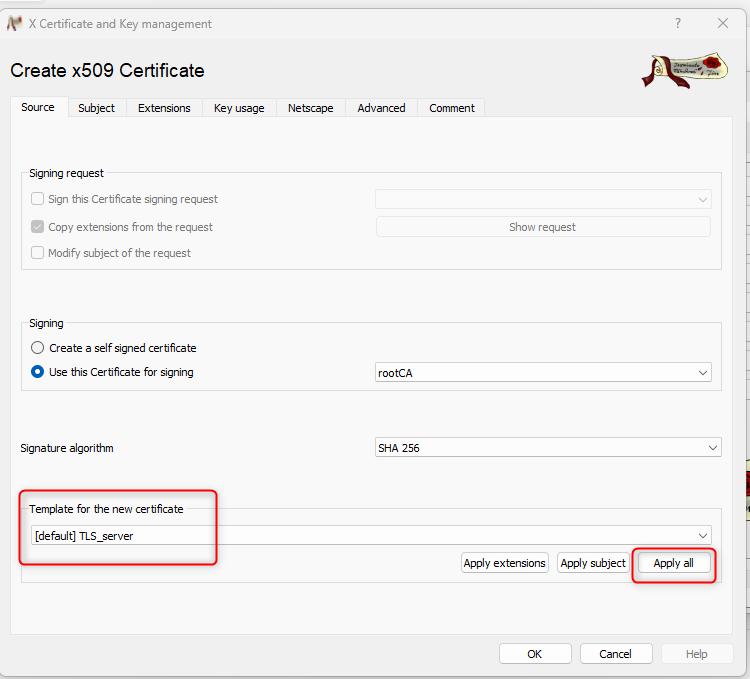
- select "[default] TLS_server" and click on "apply all":
- switch to "Subject" and fill out the fields. Important: Internal Name & commonName should be unique in each certificate:
You can select the before created key for the server certificate or you can also create a new one:
You can select the before created key for the server certificate or you can also create a new one:
- switch to "Extensions" and select "End Entity" and activate both "Key identifier":
- switch to "Advanced" and enter the "subject alternative name" with the following syntax:
subjectAltName=URI:urn:[FQDN:Port], DNS:[FQDN]
For example:
subjectAltName=URI:urn:[FQDN:Port], DNS:[FQDN]
For example:
- and click on "OK"
Client -certificate:
- click on the root certificate and select "New Certificate":

- click on the root certificate and select "New Certificate":
- select "[default] TLS_client" and click on "apply all":
- switch to "Subject" and fill out the fields. Important: Internal Name & commonName should be unique in each certificate:
You can select the before created key for the client certificate or you can also create a new one:
You can select the before created key for the client certificate or you can also create a new one:
- switch to "Extensions" and select "End Entity" and activate both "Key identifier". In addition, click on "edit" and add a "subject alternative name".
the syntax is the following: URI:urn:[FQDN]
For example:
the syntax is the following: URI:urn:[FQDN]
For example:
- afterwards click on OK
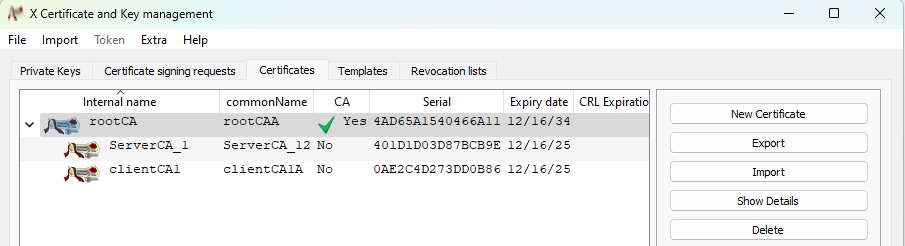
All certificates are created:
3. Export the server - and the client key ( it is not necessary to export the root-key)
the order does no matter
- select the right format (.pem) and enter the right file extension:
3. Export the server - and the client key ( it is not necessary to export the root-key)
the order does no matter
- select the right format (.pem) and enter the right file extension:
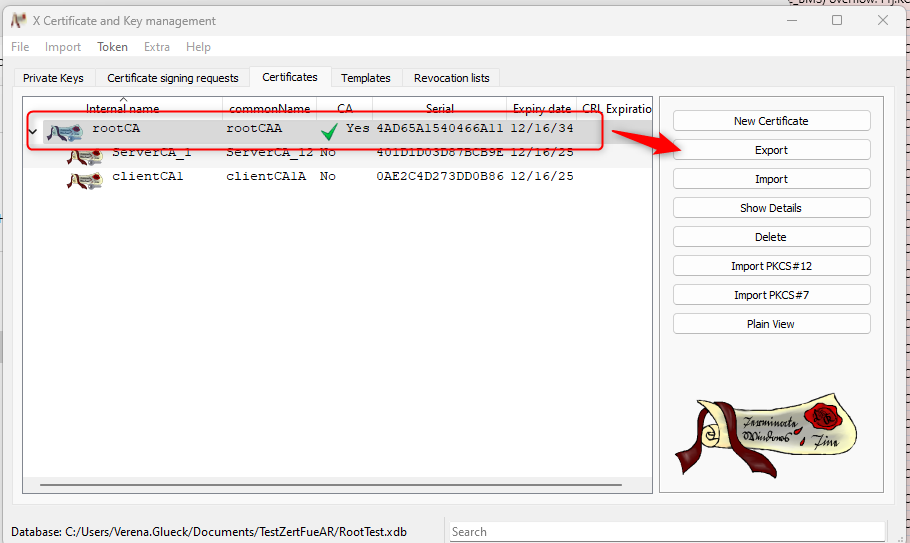
4. Export the all certificates (root, server and client)
Export the root certificate:
- select the root certificate and click on "Show Details":
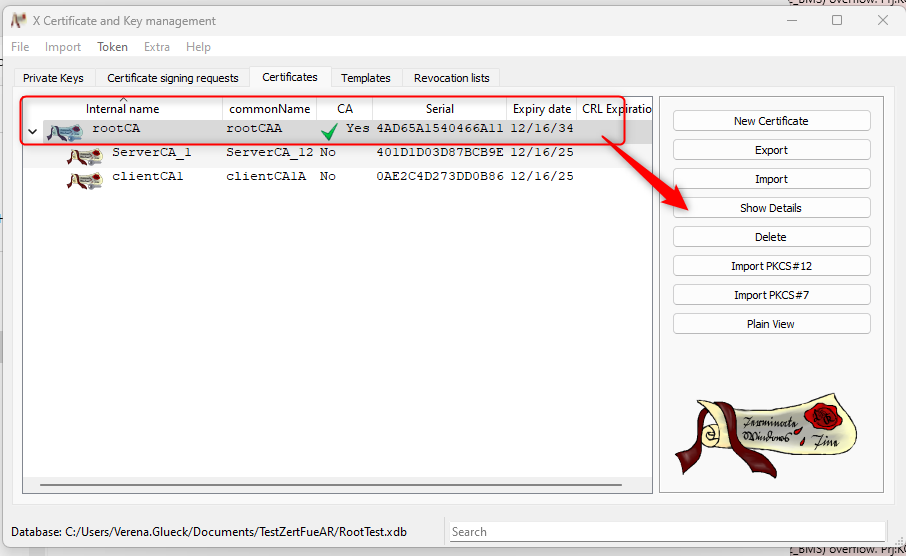
- switch to "Subject" and copy the Hash. Click on "Cancel" and select "Export":
- after exporting, rename the root certificate.
syntax: [hash.0] :
For example:

syntax: [hash.0] :
For example:
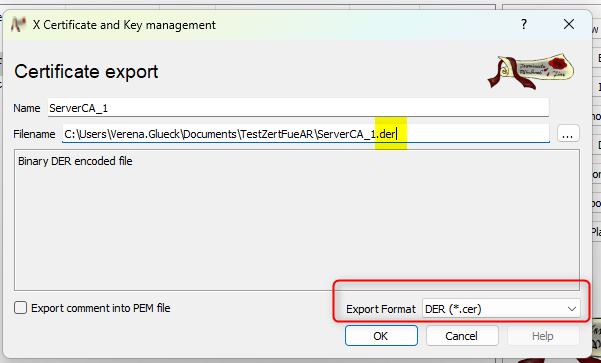
Export server- and client certificate:
- click on server - or on client certificate (the order does no matter) and click on "Export".
- click on server - or on client certificate (the order does no matter) and click on "Export".
Both certificates must have the extension “.der”.
The correct format must therefore be selected and the correct extension entered:
so now, all certificates + all keys are created and exported-----------------------------------------------------------------------------------------------------------------------------
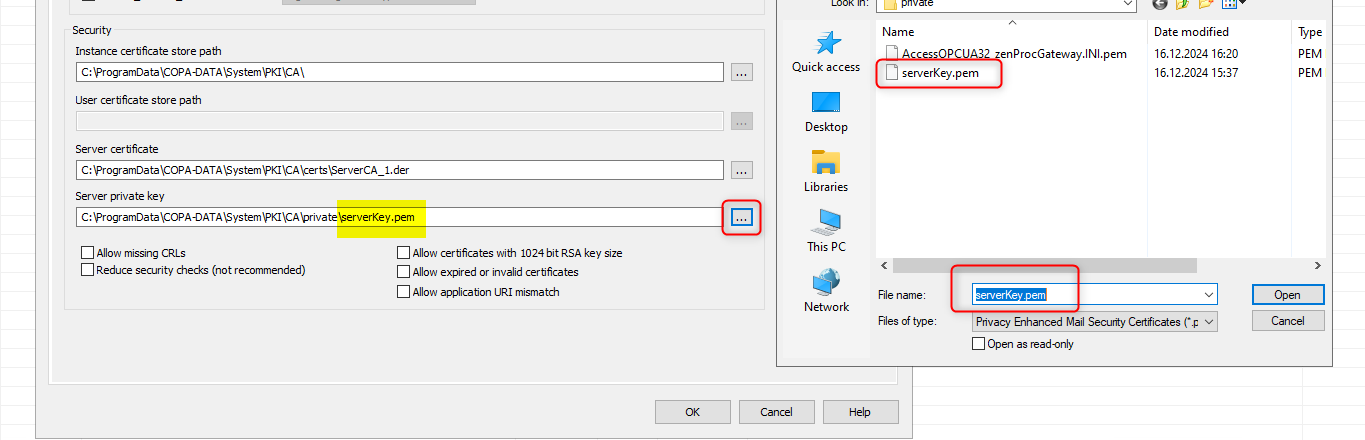
Switch to the server PC:
1. open the following path" C:\ProgramData\COPA-DATA\System\PKI\CA\certs" and insert (via copy and paste) the server- and the root - certificate:
3. click on "..." of the server server private key and instert it (via copy and paste). select it:
Connect to client- PC
1. open the following path of the client-PC "C:\ProgramData\COPA-DATA\System\PKI\CA\certs" and insert (via copy and paste) the client- and the root - certificate:
2. insert it (via copy and paste) the client certificate. Choose it:
3. Insert (via copy and paste) the client private key and select it:
Related Articles
FAQ: How can I browse an OPC UA Server using the zenon OPC UA Client Driver?
Go to Drivers > New Driver Create a Driver of Type "OPC UA Client Driver" Open the Driver Configuration Go to "Connections" Create a new Connection Enter your Discovery URL Enter your Server URL manually or click the 3 dots to browse the Discovery ...OPC-UA Server: DNS Name used in certificate created by zenon.
The creation of the DNS name in the OPC-UA Server certificate may vary depending on the zenon build and if the machine is within a Workgroup or is part of a Domain. This information can be verified in the certificate, the certificates files (*.der) ...Secure Connection with Certificate between OPC UA Driver and Siemens TIA OPC UA Server
First of all protect the project in TIA with User and Password. Activate the OPC UA Server. Activate the property “use global security setting for certificate manager” Choose an security policies Create a Server Certificate in TIA as following: ...The OPC UA server in the process gateway does not correctly check the certificate revocation lists.
Summary When using a CA signed certificate for a OPC UA client, it is possible to place the CA root and any intermediate CA signing certificates, in the certificate trust list folder for the OPC UA process gateway. When using CA signed certificates, ...The zenon logic OPC UA server fails to start in case the directory structure for storing the application instance certificate does not yet exist.
Summary When the zenon logic OPC UA server is started for the first time on a PC by default it will attempt to create a self-signed application instance certificate. In case the directory structure for storing the application instance certificate ...