Checklist: Step-by-Step guide - How to create a remote logging
Time estimate: 10 minutes
Please go through all the points in the following checklist. If necessary, confirm with IT Department any information you cannot verify before contacting your local COPA-DATA Representative.
For the purpose of this step-by-step/checklist guide, logging server and clients are connected via TCP/IP using the following constellation:
Remote logging constellation used as example
- The communication between logging server and clients should be possible. Ping commands must be successful in both directions.
- Make sure there is no firewall or other network traffic restrictions that can block the connection.
- In zenon configuration file (zenon6.ini) of the logging clients,
- Section [NETZ] with the property LOG=1 is present. If not enter it.
- Section [LOGGING_SYSTEM] is present. If not create it.
- In this section enter the following line: LOG_CONFIG=DEVICE=TCP/IP;HOST=REMOTEHOST;PORT=50780;TIMEOUT=10;


In earlier zenon 6.51 or older versions this section was called [SYS_REMOTE].
In the example, use the following inputs in the parameters:
- REMOTEHOST=cdsbg057.copa-data.internal; (Logging server computer name / IP address)
- DEVICE=TCP/IP; (Default value, only TCP/IP is available in zenon 7.00 and newer versions)
- PORT=50780; (Default value in zenon 7.00 and newer versions. In zenon 6.51 and earlier versions the default port is 1101)
- TIMEOUT=10; (Default value)
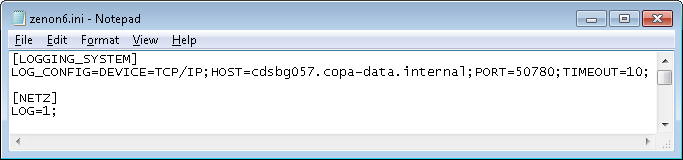 Logging client: zenon configuration file (zenon6.ini)
- In the logging server,
- In the zenon configuration file (zenon6.ini), the section [LOGGING_SYSTEM] (or [SYS_REMOTE]) is not present. This is added later automatically via the Diagnosis Viewer tool.
- Start the Diagnosis Viewer in the logging server from zenon Startup Tool > Tools. In the menu open Settings and select Server configuration. Use the default settings and click OK.
- Start the Service Engine on the client devices.
- Open the Client configuration of the Diagnosis Viewer on the logging server now. Select the logging client process and the respective module(s) and message levels to be logged.
Logging Server: Diagnosis Viewer logging client configuration
- Start logging in the Diagnosis Viewer in the logging server by clicking the green circle (= Start online logging) or open 'File -> Online ...'.
Other relevant information:
- Changes introduced in zenon6.ini require a restart of the Service Engine because they are overtaken only upon start of the Service Engine.
- The Service Engine reads the settings and sends the logs to the logging server as configured.
Logging configuration and Service Engine logs scheme
- The logging server writes the LOGs into the configured directory in the background.
- The Diagnosis Viewer can connect directly to the logging server and get the incoming LOGs while it is online or by opening the LOG files in the LOG directory.
- It is possible to change the modules and the message level of a logged process (client) in Diagnosis Viewer -> Client Configuration. Changes with the Diagnosis Viewer are overtaken instantly and when the Diagnosis Viewer is closed.
If the problem persists after completing this checklist and followed corrective actions, please contact your local COPA-DATA Representative providing a SIC-Reduced Report from the target computer(s) and the result of this checklist – please include any additional information or comments related with the points addressed you find relevant.
System Information Collector is a standalone COPA-DATA application that collects relevant data about the Operating System and zenon Software Platform for troubleshooting purposes. SIC is installed with zenon and can be started from zenon Startup Tool (Tools).
Related Articles
Checklist: Service Engine files cannot be transferred via Remote Transport
Time estimate: 30 minutes Please go through all the points in the following checklist. If necessary, confirm with IT Department any information you cannot verify before contacting your local COPA-DATA Representative. Checklist usage: #. [Quick hints] ...Checklist: Process closes unexpectedly (***Non-reproducible***)
Time estimate: 45 minutes Please go through all the points in the following checklist. If necessary, confirm with IT Department any information you cannot verify before contacting your local COPA-DATA Representative. Checklist usage: #. [Quick hints] ...Checklist: OPCDA Server
Time estimate: 20 minutes Please go through all the points in the following checklist. If necessary, confirm with IT Department any information you cannot verify before contacting your local COPA-DATA Representative. Do NOT use DCOM in combination ...Checklist: Process Gateway cannot start
Time estimate: 30 minutes Please go through all the points in the following checklist. If necessary, confirm with IT Department any information you cannot verify before contacting your local COPA-DATA Representative. Checklist usage: #. [Quick hints] ...Checklist: Process closes unexpectedly (***Reproducible***)
Time estimate: 30 minutes Please go through all the points in the following checklist. If necessary, confirm with IT Department any information you cannot verify before contacting your local COPA-DATA Representative. Checklist usage: #. [Quick hints] ...